Zero-Downtime Kubernetes Deployments on AWS with EKS

I am Jakob—an engineer working at Glasskube, which helps companies distribute their application to customer-controlled environments.
We build an Open Source Software Distribution platform called Distr (github.com/glasskube/distr),
the hosted version of which is running on AWS EKS.
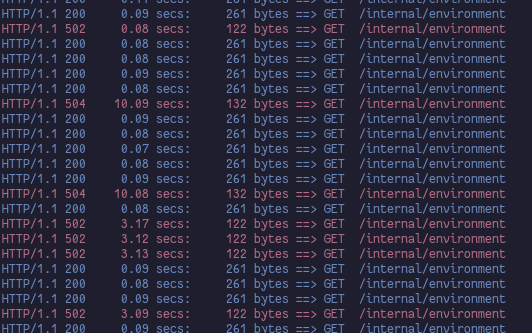
If you have ever hosted a web-application on EKS, Amazon's managed Kubernetes offering, you are most-likely familiar with the AWS Load Balancer Controller project (formerly AWS ALB Ingress Controller). If you have also upgraded that application, you might also be familiar with reports like this:

The upgrade you just triggered has caused downtime for your application! You might think that there is an error your application, but all your logs and metrics seem to indicate that it's doing just fine. The truth is that although the AWS Load Balancer Controller is a fantastic piece of software, it is surprisingly tricky to roll out releases without downtime.
In this blog post I will share what we have learned in the process of achieving this goal, hopefully in a way that you can adapt to your own application. But before getting to the solution, let's take a look under the hood and learn how the AWS Load Balancer Controller actually works.
Background: How do Load Balancers Work in Kubernetes on AWS with EKS
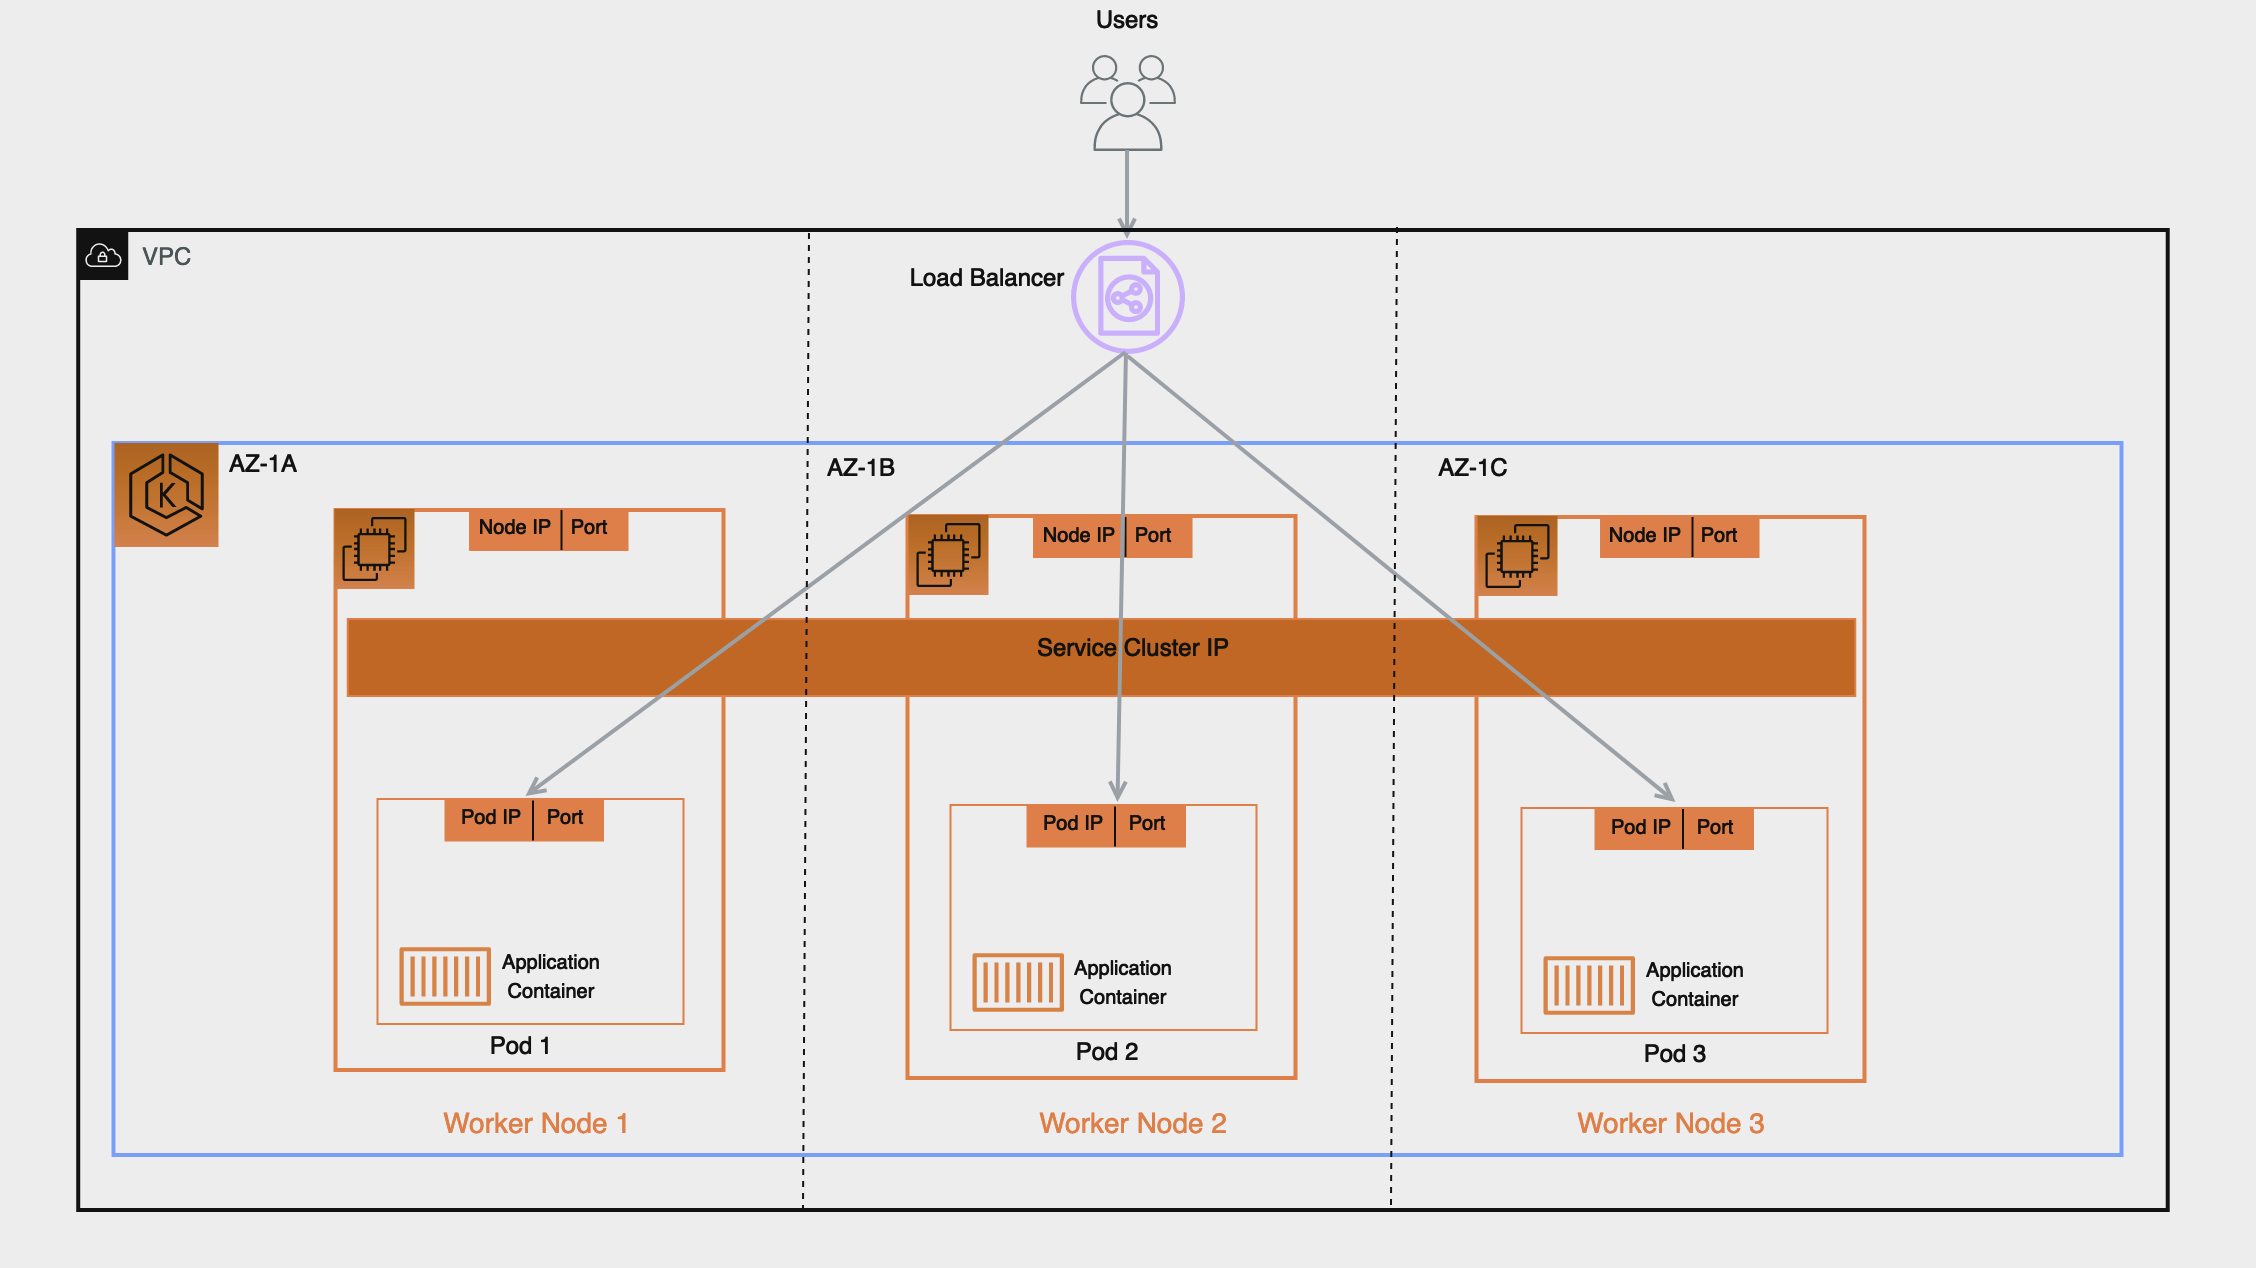
In Kubernetes, usually every pod has its own IP address.
This IP address can be used to communicate with a server application running in that pod via the clusters' internal network.
In most cases, however, this IP is not publicly routable, so to make your server application available to the public, you need to either expose your service via a Kubernetes service with type NodePort or, more commonly, via an Ingress or a Kubernetes service with type LoadBalancer.
Both of these options are similar in the sense that Kubernetes doesn't normally come with a solution to reconcile these resources out of the box.
So, if your managed Kubernetes distribution does not come with built-in support via their Cloud Controller Manager implementation, or you are running an unmanaged Kubernetes cluster, you will have to install your own implementations of these features.
For this blog post we will focus on AWS EKS, where the AWS Load Balancer Controller is the canonical way to handle both Ingress and LoadBalancer resources.
It automatically maps Ingress resources to AWS Application Load Balancers and LoadBalancer services to AWS Network Load Balancers.
In both cases, it creates a TargetGroupBinding that represents the target group in the AWS ecosystem and watches the services Endpoint resource to update the target group with the IPs from the Endpoint.
An Endpoint is created by Kubernetes for each service, and it tracks which IP addresses are routable via that service.
The endpoint controller uses several signals to determine whether pod is eligible to be part of an endpoint, including container probes and whether the pod is marked as "terminating".
From the above, it follows that the AWS Load Balancer Controller simply adds missing IP addresses to the target group and removes superfluous ones, but unfortunately, both of those actions take some time which can lead to downtime in subtle ways. After an IP address is added to the target group, the AWS system starts performing its own health check, which is completely unrelated to the Pod's container probes. Only once this health check indicates that the target is healthy, will the Load Balancer start routing traffic to that target. But because Kubernetes doesn't know about this external health check, it continues to replace other replicas of the workload which can lead to a situation where all pods have been replaced, but none are considered "healthy" by the Load Balancer yet. Conversely, if a Pod is marked as "terminating", it takes about 5-15 seconds for the AWS Load Balancer Controller to register this change and the Load Balancer to drain the target. But if the application has already terminated, it might still try to route some requests to this target, which results in a 502 or 504 HTTP error for the client.
A 502 HTTP error code stands for "Bad Gateway", which, in our case, means that the load balancer was not able to get a valid HTTP response from a target, either because no target is available, the target sent an invalid response or no response at all. A 504 HTTP error code on the other hand stands of "Gateway Timeout", which means that the target didn't send a response in time. This is exactly what had happened when I took the screenshot in the introduction.
Fortunately, both of those issues can be worked around, but the documentation is a little nebulous about how everything works in detail.
Testing Zero-downtime deployments
In what follows, I will describe several solutions to the issues outlined above, all of which are necessary to solve one part of the general problem.
If you follow along, implementing these solutions for your own application, I suggest testing your changes after each iteration using siege.
Siege is an HTTP load testing utility that is perfect for our use-case.
It lets you define how many requests it sends to your server, shows you the status code of each request and prints a nice summary at the end.
It can be invoked like siege -c 2 https://your-application.example.com, where -c 2 tells it to perform 2 requests in parallel.
How we achieved Zero-downtime deployments in three parts
Part 1: Using Pod Readiness Gate on AWS EKS
The first issue (pods being cycled too quickly by Kubernetes) has, arguably, the easiest solution.
Kubernetes supports adding extra pod status conditions by the use of Pod Readiness Gates.
These readiness gates are considered for workload availability in addition to the container probes built-in to Kubernetes.
For a Deployment this has the effect that during a RollingUpdate rollout the Deployment controller will not scale down the old ReplicaSet any further until the new Pod has a readiness gate indicating that it is "ready".
The AWS Load Balancer Controller supports adding readiness gates to relevant pods to indicate the load balancer health check status.
This can be enabled by simply labeling the Namespace where the pods are situated with elbv2.k8s.aws/pod-readiness-gate-inject=enabled.
If you do this, you will notice that Kubernetes will wait for a while before starting to terminate the next pod as it waits for the first one to become ready.
To show readiness gates using kubectl you can use kubectl get pods -o wide.
Part 2: Graceful Application Shutdown in Go
This part does not directly relate to one of the issues above, and it is relevant not only to the AWS ecosystem.
To minimize downtime, your web server must not terminate immediately when instructed to do so by the operating system.
The solution described here applies to applications written in Go, using the standard library http module for serving and listening.
Take a look at the following example web application:
package main

import (
	"fmt"
	"log"
	"net/http"
)

func main() {
	if err := http.ListenAndServe(":8080", MyAppRouter()); err != nil {
		log.Fatal(err)
	}
}

func MyAppRouter() http.HandlerFunc {
	return func(w http.ResponseWriter, r *http.Request) {
		fmt.Print(w, "Hello world!")
	}
}
This shows the most common way to start a web server in Go, but it does not shut down gracefully. At the very least, it has to wait for ongoing request handlers to finish, gracefully terminate long-standing connections. A more complex application should probably also close all connections to databases, synchronize logs and more.
By creating an http.Server instance and handling the termination signal, you can easily trigger a graceful shutdown of the server.
Intuitively, you might build something like this:
func main() {
	srv := http.Server{Addr: ":8080", Handler: MyAppRouter()}

	go OnSigterm(func() {
		if err := srv.Shutdown(context.TODO()); err != nil {
			log.Fatal(err)
		}
	})

	if err := srv.ListenAndServe(); err != nil {
		log.Fatal(err)
	}
}

func OnSigterm(callback func()) {
	sigint := make(chan os.Signal, 1)
	signal.Notify(sigint, syscall.SIGTERM, syscall.SIGINT)
	<-sigint
	callback()
}
While the above does look correct, it doesn't actually help with the problem at all.
If you carefully read the documentation for the net/http package you will see this:
When Shutdown is called, Serve, ListenAndServe, and ListenAndServeTLS immediately return ErrServerClosed. Make sure the program doesn't exit and waits instead for Shutdown to return.
Oops! This means we have to do two additional things:
- Catch the
ErrServerClosedreturned in this case - Only exit after
Shutdownhas completed
Fortunately, the first task is trivial, and the second can be easily accomplished by using a Go channel:
func main() {
	srv := http.Server{Addr: ":8080", Handler: MyAppRouter()}

	shutdownComplete := make(chan struct{})
	go OnSigterm(func() {
		if err := srv.Shutdown(context.TODO()); err != nil {
			log.Fatal(err)
		}
		close(shutdownComplete)
	})

	if err := srv.ListenAndServe(); err != nil && err != http.ErrServerClosed {
		log.Fatal(err)
	}
	<-shutdownComplete
}
After applying this fix, I was personally very excited to try this improved shutdown procedure, but was disappointed to find that it almost didn't help at all:
You can also see this in the AWS UI for target group monitoring as the "Target connection errors" metric
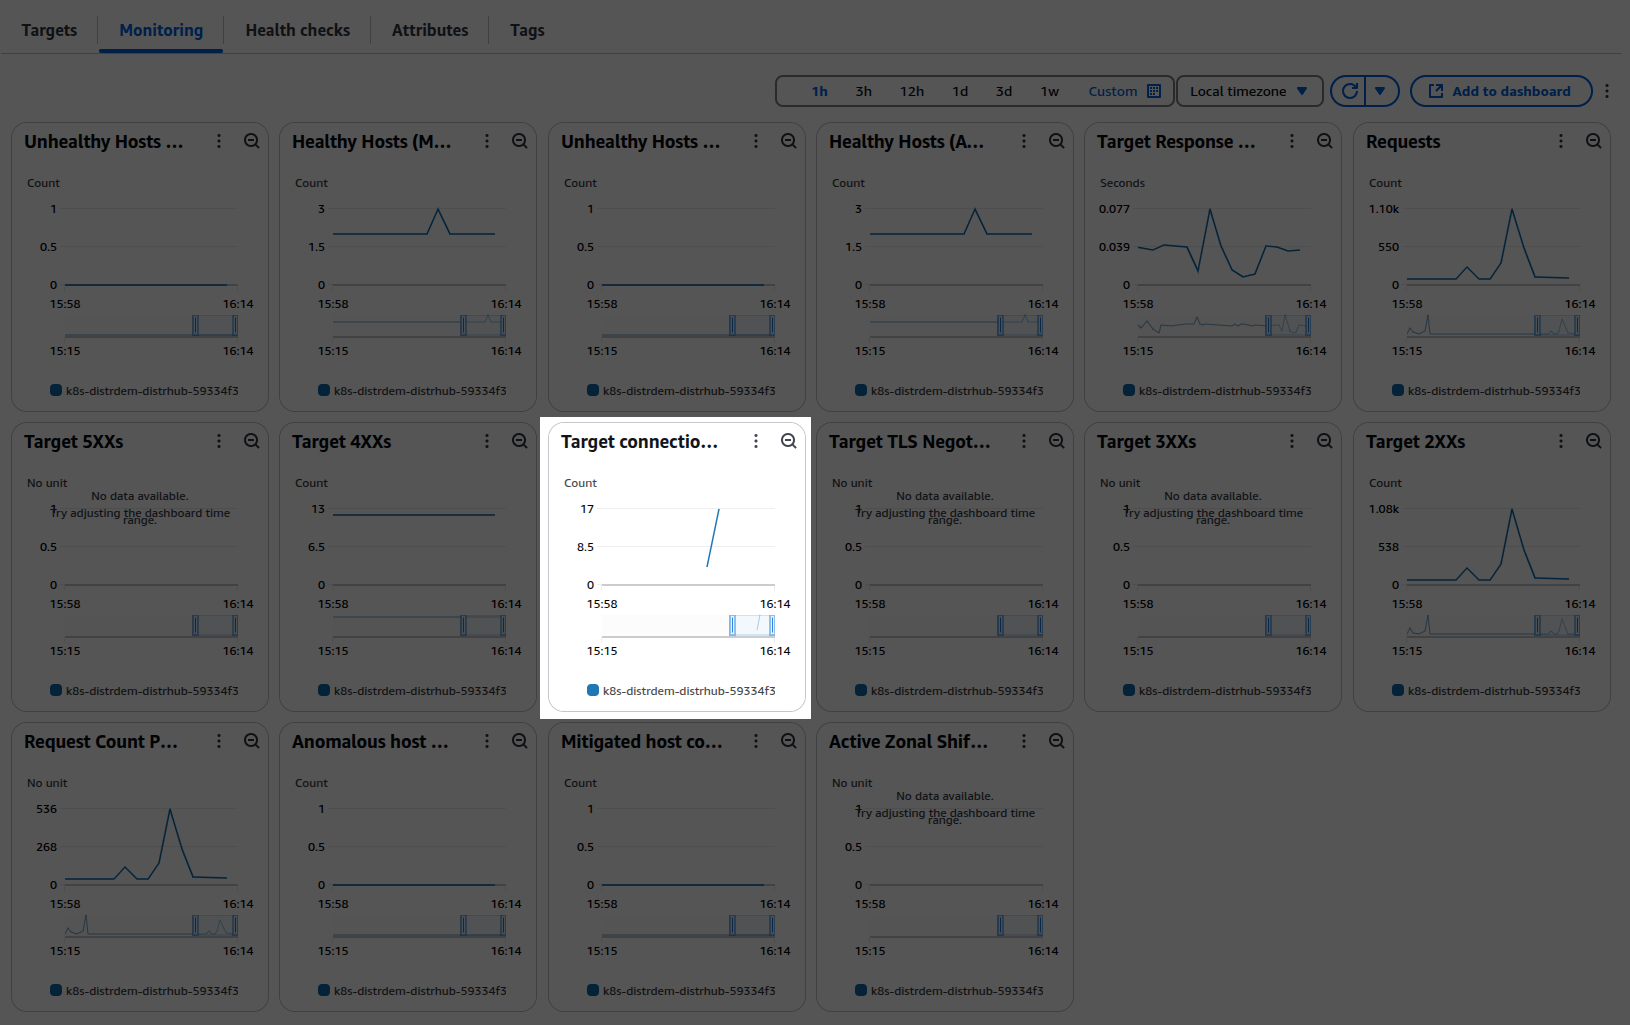
The reason for this is obvious in hindsight, and attentive readers of this blog post might already have figured it out: The AWS Load Balancer keeps sending new requests to the target for several seconds after the application is sent the termination signal! So, in order to actually fix issue number two from above, you have to make your application wait for some time after receiving the termination signal before initiating graceful shutdown.
Part 3: Kubernetes Termination Delay with Sidecars for Go applications
As alluded to before, it usually takes 5-15 seconds for the endpoint change to fully propagate to the target group.
Since you can not be sure how long it will actually take, determining the amount of time to wait is kind of a balancing act between safety margin and rollout speed.
I would recommend a value between 20 and 30 seconds, since anything below that might risk terminating too early and everything above seems excessive.
The canonical way to achieve such a "shutdown delay" in Kubernetes without modifying your applications code is to add a preStop lifecycle hook to your pod template definition.
That usually looks something like this:
apiVersion: apps/v1
kind: Deployment
metadata:
  name: myapp
spec:
  template:
    spec:
      terminationGracePeriodSeconds: 40
      containers:
        - name: my-app
          # ...
          lifecycle:
            preStop:
              exec:
                command: [sh, -c, 'sleep 20']
If your application's container image uses a full base image such as ubuntu, debian or alpine, you should definitely go with this approach.
However, a pattern that is becoming more and more common is the use of distroless base images.
These base images don't contain the typical GNU coreutils or even a shell, so the preStop lifecycle hook cannot be used as described above.
After carefully reading the Kubernetes documentation on the topic of Pod termination,
you might be tempted to add a sidecar container with a preStop lifecycle hook to your deployment to stop your application to be terminated too quickly.
- name: busybox
  image: busybox
  command:
    - sh
    - -c
    - |
      trap 'echo signal received' TERM INT
      echo waiting for signal
      sleep 9999999999d & wait || exit 0
  lifecycle:
    preStop:
      exec:
        command: [sh, -c, 'sleep 20']
Unfortunately, after lots of trial and error, I have found that this does not work.
Although your application container keeps running until the Kubelet sends the termination signal to all your containers, the ports are immediately closed as soon as the pod enters the Terminating phase, even though the underlying application remains in the "ready" state until it receives the termination signal after the preStop lifecycle hook of the sidecar container has finished.
In those cases, your only option is to bake this feature directly into your application. You can either stick with the preStop lifecycle hook idea and implement something like a sleep sub-command or HTTP endpoint, or (my preferred solution) allow your application to wait for some time before shutting down the server.
This is easy enough to accomplish in most programming languages. In Go you just have to call time.Sleep with the desired duration.
var terminationDelay = 20 * time.Second

func main() {
	srv := http.Server{Addr: ":8080", Handler: MyAppRouter()}

	shutdownComplete := make(chan struct{})
	go OnSigterm(func() {
		time.Sleep(terminationDelay)
		if err := srv.Shutdown(context.TODO()); err != nil {
			log.Fatal(err)
		}
		close(shutdownComplete)
	})

	if err := srv.ListenAndServe(); err != nil && err != http.ErrServerClosed {
		log.Fatal(err)
	}
	<-shutdownComplete
}
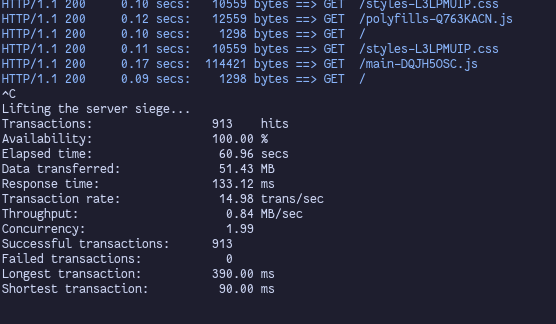
If you deploy this application and test the rolling update, you will see that there are no more 502/504 errors. We have achieved 100% downtime-free deployments!
Conclusion
In this blog post we learned how to deploy on AWS EKS with zero-downtime by enabling Pod Readiness Gates and implementing graceful shutdown as well as a termination delay.
But in addition to this, I hope that, like me, you were able to learn something about how external load balancers work in Kubernetes.
To me, it's always interesting to take a look below the surface of a complex system, this time learning about Endpoints, EndpointSlices, TargetGroupBindings and so much more, and I'm sure this knowledge will be very useful in the future.
If you want to see a real-world implementation of these features, check out Distr (github.com/glasskube/distr), our Open Source Software Distribution Platform!